Thursday, May 28, 2015

A Little Nook to Stitch In

I have a little sewing nook. It's just one part of my crafty corner of the world.
Here's what I've managed to place in one small sewing nook: a small table, definitely vintage, I've had for years, a shelf overhead for some vertical storage with hooks underneath to attach ribbon rods, and a shelf unit hubby built on top of the table. There's a bit more storage underneath the table as well, since I don't sit at it.


The shelf lets me have extra, usable, active storage, and let's me stand while I sew at the machine, which I often prefer. Since my machine is easily portable, it can be moved to the dining table for a big, day-long project if needed. I have a Brother sewing machine which is also an embroidery machine--so it's nice to have all the attachments and machine extras organized here in one place. When I need to convert it to embroidery mode, I make room there by moving my sewing caddy, attach the extra arm, change the foot, and I'm ready to go. My sewing caddy box with the handle came from Michaels last year--I used the coupon so it was a great deal. It's usually sitting there by the machine--but it is full of supplies that can travel around the house if I'm doing a hand-stitching project.
Here's a peek behind the table shelf--since there is room back there, I have a place for my spool rack, and some sewing extras.
It's nice to have the ribbon handy there too--they are actually hanging on very sturdy, dried out tree branches. When I think back on how my mother sewed, I realize how different I am with how I do things in my little sewing nook. My mom had a big, gorgeous sewing cabinet, and a quite expensive for the time sewing machine. Everything was inside her sewing cabinet, so when she wasn't sewing it was nice and shut up. I have no room for a huge sewing cabinet like that, and I'm a little more eclectic--plus, I love to stand when I'm stitching because I just feel like I have more control, and it's kinder to my back. I do remember how excited my mom was when I got this sewing machine. I definitely got my love of stitching from that beautiful, amazing lady. And I always think of her when I start on a project.

I've been reorganizing to make the most of my stash all year! I think being organized and knowing what you have, as in "active storage" rather than simply being a warehouse for stuff you've lost track of, is the number one way to dash your stash. Saves money! And it's a plan that applies to every room in your house. Happy Stitching.

Stash Dash 2015
Organize Your Fabric
Reorganizing My Craft Desk
Reorganizing My Small Stamp Collection


Eat, Write, Dream, Stitch

Wednesday, May 27, 2015

WOYWW 312--A stitch here, a tag there

I really think What's-On-Your-Workdesk-Wednesday should be made into a movie. Just take a peek at these wonderful crafty desks every week and you can only imagine the fascinating crafty people and lives that go along with them!

Although I never think my desk is that fascinating. But I have enjoyed moving into my old/new desk and I actually got a little stitching done this week.
I found a UFO (unfinished object) that originally was going to be some kind of patchy wall hanging, and I finished a little applique on it and ended up stitching it into a pillow. I am about finished with my fifth cross-stitch matryoshka doll--still deciding on what these girls are going to be exactly, but hopefully they won't be UFO's laying around! I'm planning a post tomorrow about my little sewing nook...one of my blogs about reorganizing.

I also planted more seeds in my garden--squash, basil, beans, spinach, and flowers--helped darling daughter throw a party of free facials and skin care, shopped, made lovely marinated and sauteed salmon one night, and cleaned out one of the last two messy corners of new desk. I found things I have been looking for, for months! Why did I get so much done? I think it's because Dancing with the Stars, Once Upon a Time, Mr. Selfridge, and Call the Midwife are over! Boo! Especially Call the Midwife...they won't be back until next spring. Love, love, love CTM. At least Chummy was back for the last episode. And, I'll say no more so as not to spoil it for anyone. But...I do love Fred and Vi together!
Back to the desk--I was working a little in my junk journal I made a few months ago...it was put together with some of the pretty pages from my past art journal style planners from Orange Circle Studio. And now, at the end of the year, I can plan to add the keeper pages from this year's. Sometimes I amaze myself. Anyway, this is one of the pages where I glued in a cute envelope pocket--very handy. Also--I've been terrible about my Tag  Tuesday making...trying to get back in the swing.
 And by the by, thank you for all the cubby envy last week!! You guys are the best. Happy Wednesday.

Eat, Write, Dream, Stitch


Saturday, May 23, 2015

Baked Herb Fries - So Easy!

Whether the main dish is fish, chicken, steak or grilled eggplant - these herb fries are the best and so easy.
Adjust the quantity to your number of diners. For four, I peel four large yukon gold potatoes, and two sweet potatoes, then chop them into long French fries. Place them in a bowl and drizzle with your best olive oil. I  buy one from our local wine center, where I can take the bottle back and refill it for about ten dollars - it's an excellent extra virgin olive oil and a great price for this tall bottle. Use around 1/4 a cup--but just make sure you coat them all.

Take a couple of sprigs of fresh rosemary, and chop up the rosemary leaves. You could also use fresh parsley or fresh dill. Toss the rosemary in with the potatoes. Then spread the fries onto two baking sheets so that they can be baked in one layer for the best result. Just the aroma of fresh rosemary gives you energy--so it's great to cook with when you're tired at the end of the day and still need to make dinner. I always keep a pot of rosemary growing year-round. Use rosemary in breads, chicken, and these baked fries.

Bake at 425 degrees for about 35 minutes. So easy, delicious, and almost as fast as the bags of frozen fries! Much fresher too!
Eat, Write, Dream, Stitch


Thursday, May 21, 2015

Organizing and Storing a Stamp Collection That Doesn't Take Over the World

I love using stamps for cards, tags and scrapbooking--but I don't have a huge collection. When watching some of my favorite craft room tours, I've seen some incredible stamp collections and there are crafters who love to display their hundreds of mounted stamps.

I'm not one of them.
My stamp storage has been pretty haphazardous!
I love a cute stamp, I will probably at some point do a stamp of the month club, but for now I don't want to have to provide the necessary real estate for 50 million stamps. I have some cute mounted stamps that are versatile and practical, but the unmounted stamps are so much easier to store. So, for the small collection I have, here's how I've reorganized things so that I don't 1--duplicate a purchase and 2--spend hours looking for one particular sentiment or image!This is part of my year-long effort to make the most of my stash, and that definitely involves being organized!

Visit my crafty reorganization here.
Visit my Stash Dash 2015 tips here.
To those crafters who display shelves and shelves of gorgeous mounted stamps, I say you go girl! I just don't have the space, and really not that many mounted stamps. I'm still quite comfortable keeping my tiny mounted stamp collection in what I call "the stamp trunk." It's a cute trunk box with a handle, and inside are a couple of small boxes with my mounted stamps, and one pencil box which contains my favorite mounted sentiments. I know exactly what's in there, and where it is, and that's what's important.
My stamp trunk is always handy.
My unmounted stamps required a little more thought. I had a big ole trapper keeper notebook, and decided it was perfect to organize my small collection of unmounted stamps. Some were just loose and not identified, so I stamped them out and added their labels to each one--the small ones fit into the clear plastic pages that are meant for baseball cards or coupons. Some cling stamps had not even been opened! And so they slipped right onto the rings of the binder. Other stamps from my fun Unity collection, Itty Bitties, were nice and packaged and labeled, and I just slipped those into the regular page protectors. Stamp organizing done! Sometimes, it's good not to have too much when you don't really need it!


Of course, group similar sentiments together.


Eat, Write, Dream, Stitch, Stamp


Wednesday, May 20, 2015

WOYWW 311--Nuttin' Honey! Just the Organization Fairies.

I love What's-On-Your-Workdesk-Wednesday, and I think you will too. It's just fun peeking at creative people's spaces! Hope mine is not too disappointing today though.
A school was throwing these cubby shelves in the trash--we rescued and painted.
It's clean! It's still fresh from a little photo session the other day where I posted about my reorganizing to a new desk. I'm still in craft-desk-shock a little bit, and I'm having to regroup myself before I spread out a project. Have you ever done that?
So I'm having a pot of lemon herb tea--I love these oversized china cups I found at TJ Maxx, and I use them for my tea all the time. I'm going through my Make List--I've consolidated all my list pads and small journals and calendar in one desk drawer together. My whole thing is to stop being a warehouse of lost storage, and use every space actively. That took some throwing out and selling out--but it's totally worth it. Lately I've written about my cross-stitch Stitchbow storage, my new desk, and tomorrow is all about organizing my stamps. I'm not a fabulous stamp collector with hundreds--so this post will be about how someone with a just a few dozen stamps organizes it. Because no matter how many or how few you have, you still need to be able to find the sentiments and images you need, and mine had been a big mess. Then, I'll post next week about my little sewing nook.

And maybe, someday, I'll actually make something!
Keeping Peter Rabbit away.
In the meantime, me, hubby, and Joseph tilled and planted the gardens! I'm growing tomatoes, all kinds of squash, herbs, lettuces, and peppers. But I'm pretty sure Joseph is squashing a squash I had just planted. *Sigh*

Eat, Write, Dream, Stitch, Grow


Monday, May 18, 2015

The Daily Magic of Crafty Tidyness

Imagine knowing exactly where everything is in your crafty space. Your tools, your scraps, your supplies and your bits and bobs all have a place. Something magical happens. You feel more inspired to create things. Your mind clears. You stop buying duplicates because you forgot or couldn't find something you already had. You're able to start a Make List of what you really want to work on, and you know exactly what you want to do with it.

That's the daily magic of crafty tidiness. I arrived there one day and now I don't want to ever leave. My craft desk, shelves, sewing nook, and worktable are just a mish mash of different pieces of furniture, and some things built just for me and my craft storage, but now they are all actively working for me. My cubbies were being thrown away and my husband salvaged, repaired and painted them. Now I know what's in every cubby!
I've been calling this year my Stash Dash 2015 (since January), in an effort to bust my stash and make the most of what I have. Stash Dash has arrived at my crafty space. At some point when you accumulate your new things, old things, scraps, and supplies, it's easy to get a little careless in where it all lands. I think it was the night I watched an episode of Hoarders that I realized I was tediously managing a controlled craft hoard. Too much was coming in and not enough was going out.

At no time do you want any space in your house to become pure, uncategorized warehouse storage. I didn't just need a cleanup, I needed a big change. My main desk had just become a dropping off place, and it needed to be a good productive workspace again. So it all got cleaned out at once--and I didn't hesitate to throw things out!


Because my cubby shelves were so stuffed with things I wasn't even using and had really lost track of, I started there. Now every cubby is either active with something I use a lot, or it's clean pretty display space. Some of the desk drawers were acting as old, wasted storage with things I hadn't looked at in years. This kind of thing needs to get cleaned out and done away with, all at once. I'm working here under the influence of the book, The Life Changing Magic of Tidying Up. It sounds too simple, right? But piddle away at it, and you won't change a thing. Do it all at once, throw it all out, completely reorganize, and the magic happens.
Always needing just a quick needle and thread? Make a place to always find it.
The awesome thing is, I already had compartment trays, baskets, and containers to make this all happen--they just weren't on my side yet. Everything was stuffed with stuff--but I wasn't using it. Here's the big mistake people make in reorganizing: they buy a bunch of containers and store things. That makes it worse. Stop being a warehouse. You've got to purge. And when you pare down to what you need, it frees that creative spirit!
This makeup bag holds my jewelry making tools and findings.
 Once you purge, consolidate. My sewing stuff is now all together at my little sewing nook. My bureau has drawers dedicated to beads, favorite craft books I actually look at, a cross-stitch drawer, paper drawer and a special place for fabric scraps I plan to use soon. I consolidated my jewelry findings and tools into a hanging makeup bag I had been given. I don't need tubs and tubs of jewelry making supplies. This is the perfect amount for me to make earrings and bracelets for gifts and my craft booth, and I can see it all! AND, it just hangs onto the side of my worktable--always handy, not hidden.

When you put things in their place and they have a place, your storage becomes handy, not hidden. If you hide things too much...you forget and don't use them, and at some point you're paying to keep things that you don't care about.
My little sewing nook
I had just won 25 random stamps from Unity. So excited when they came in the mail! And that prompted an entire cleanout of my stamp storage. Because I don't really have a huge inventory of stamps, my storage had been unorganized and sloppy. So with the relatively small amount of stamps I have...compared to other scrapbookers and cardmakers...it was worth it to take the time and come up with a great system for me. I'll share that one later in the week, and also talk more later about my little sewing nook.

Completely reorganized my stamps--will share that later!
What you really have to do, when it comes to your own personal crafty space, no matter how big or small, is have a brainstorm. That's right...a good old-fashioned brainstorm. Really think about how you use it every day, what you want to accomplish, if you care whether it's a pretty space, or simply productive, and how you can get your hands on exactly what you need for a project, know where it is, and know what you don't need to keep for "someday."
My old craft table is my cutting and ironing table.
Every day, my craft desk is a great place to land--I can work on the computer, or my latest craft project. It's always ready for me to just spread out the photos and papers and scrapbook. It's easy to keep an ongoing list of supplies I need, and things I want to make with what I have. The best thing is, I'm better at throwing things out now! That just took a couple of Tiny House episodes. Let me tell you, these people in the tiny house community really know how to pare things down and make furniture do double duty--very inspiring. I do still have a lot of things because I'm a maker. I need some inventory and supplies. As long as it's active and organized, that's what matters in making my crafty space magical.
Eat, Write, Dream, Stitch, Tidy Up


Saturday, May 16, 2015

The Art of Saturday Morning

Formal tea ceremonies fascinate me. Every little movement in the preparation and presentation of the tea is meaningful, graceful, and highly respectful from the subtle way a finger lifts a tool to the repetitive entire ritual of it. Just the fact that it is also called "the art of tea" and has been around since ancient times speaks volumes. The whole display is meant to take a moment in time, pause, and adore something simple and beautiful amidst the sordid everydayness of life. I feel that way about my Saturday mornings sometimes.
My morning yoga moves...the making of my coffee...pouring...stirring...sipping...stitching...breathing the fresh air and feeling the sunshine as I take the next sip.

Minnie...sleeping cozily next to me...reminds me that I'm not in a hurry today. I don't have to put on makeup, figure out what to wear, or make a lunch to go. It's Saturday morning. And I'm peaceful, relaxed, and stitching in my happy place. It's a bit meditative. I could call it a little ceremonial, because it happens often and makes my day better. But we'll just make it simple, and call it the art of Saturday morning.
Eat, Write, Dream, Stitch

Thursday, May 14, 2015

Organizing a Cross-Stitch Project

 Remember when big cross-stitch projects were all the rage? I know, it was decades ago. And at that time, I think floss was 20 cents a skein or even less. And I actually bought a set of over 350 skeins in some cross-stitch magazine (before the internet) for $18! It formed the base of my DMC collection, and I still work from it a lot.

But...*sigh*...the world of cross-stitch has changed for me and many others.

I don't really work on huge projects anymore, simply because one giant project could take a year or even more. And I have so many crafts I love to do. Cross-stitch is a form of yoga for me though, so I could never give it up. I just tend to do more quick, small projects. And afterall, how many giant cross-stitch framed pieces do you need? I make things now like pillows, cards, bookmarks, and banners with other media stitched and mixed in. That's what I like.

But this year, I found a dollhouse project I love. El Blog De DMC features one room a month, and she started in January. I think I could handle stitching one room a month, so with a great coupon because I can't stand to pay full price on floss now, I bought the 37 colors for the project. I already have the aida cloth I need, and I'm  ready to go.
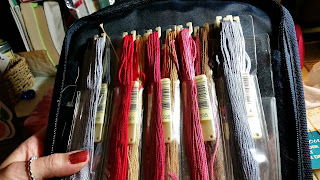
I don't think I have the patience to sit and wind 37 skeins, and I don't feel like using the bag system, but the Stitchbow sysem is very easy. You just pop the whole skein right on there. I have a large Stitchbow bag--which is quite full right now--and then I have a smaller one which had plenty of space for the floss for this project.
 And since I was using a coupon on the whole purchase, I couldn't resist treating myself to my favorite gold needles! They slip in and out as you stitch so nicely. I wonder if Egyptian sewists had gold needles way back then?
The colors in this project are gorgeous. Each Stitchbow page in my mini bag fits five skeins on each side. I didn't have to buy any extra of those, yay! 

But I am jealous because now they have some really cute colors...I just have the original navy bags--but that's okay. Navy's good. I'm trying to use what I have this year...so it's bad enough I bought the floss without looking in my stash, right?
I have a good excuse. It was Mother's Day. This bag is small, so if I'm on the go with this project it will fit in a tote bag along with my aida cloth canvas and the room pattern I'm stitching. 

It's good to have projects!

Eat, Write, Dream, Stitch