

 I am not a fancy or complicated knitter, but this butterfly scarf is absolutely easy, and gives the kind of results that make me look like an expert! Gotta love that. I made my first scarf with a thin, super soft yarn, and I love the results. I didn't want this scarf to be too long, and I wanted a funky affect by starting off with a longer section in pink and then finishing with the purple in the same yarn.
Make sure when choosing your yarn that you use the appropriate needles to get the prettiest effect. When I first began this scarf, I had never done short rows before. The first several rows look quite odd to me, and I thought I was doing something wrong! But it actually looked exactly like it's supposed to look, and after several more rows I began enjoying the whole ruffle effect. So fun!
 |
| This little picot trim is ultra easy to do. |
 |
| This scarf grows quickly! |
 |
| Adding in the purple. |
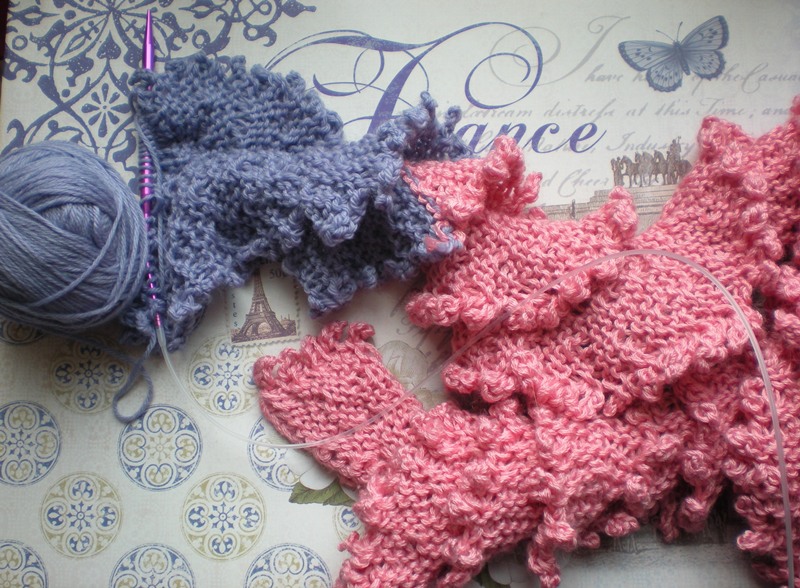 |
| Soon you'll have ruffles everywhere. |

How This Works--This scarf is created by making small pieces in short row sections that are repeated to create butterfly wings on each side of a narrow center. Small Picot is worked along the edge by casting on and then binding off 3sts.
INSTRUCTIONS
With appropriate needle and yarn, Cast on 24sts. Knit 2 rows. Work first section as follows:
- Row 1: C/O and B/O 3sts for Picot. Knit 9sts more.
- Row 2: Turn and knit to end of row.
- Row 3: Turn. Sl.1 and Knit 6sts more.
- Row 4: Turn and knit to end of row.
- Row 5: C/O and B/O 3sts for Picot. Knit 3sts more.
- Row 6: Turn and knit to end of row.
- Row 7: Turn. Sl.1 and knit to end of complete row. (You are now on other side of scarf.)
Repeat rows 1-7 until scarf is about 57” from bottom point or desired length less top ruffle.
You can do a regular bind off to finish or you can give it more of a ruffle in the finishing as follows.
SPECIAL FINISHING: When scarf is desired length, work across the first 12sts. Slip the remaining 12sts to another needle. Work 3 needle bind off to join. Sew cast on edge in half to close or pick up 12sts each on two needles and work 3 needle bind off to match and close beginning end.

Eat, Write, Dream, Stitch, Knit
That's a really simple pattern but the effect is gorgeous! I think I shall use some of my spare yarn and start running up some scarves for the Women's Refuge in Salisbury...they would make nice Christmas presents!
ReplyDeleteThank you for showing us how to do it :-)
LLJ xxxx