Showing posts with label tote bags. Show all posts

Tuesday, November 10, 2015

The Bag in a Bag Plus a Super Cute Wristlet

It's my birthday and I thought I'd share one of my presents which came from Charming Charlies!
It's called the Bag-in-a-bag, and it comes with one of those little matching zipper bags which loops onto the handle. But inside, there is a bag in the middle that zips, and then two roomy compartments on each side. This is perfect for carrying all the purse essentials, plus my big Midori planner, my lunch for the day, a scarf, and anything else I need. I usually love a fun bright color, but I was in the mood for a classic black with camel trim.
See it really is a bag in a bag!
I've been loving the charming bags lately because they are sturdy, durable, the hardware is shiny and gorgeous and stays that way, they have lots of pockets and nobody threw away thousands of dollars on something I might get tired of!

Now, although this bag is all you would need, I did have a birthday coupon, which allowed me to get this adorable wristlet for free. It is perfect to throw into the bigger bag, and it comes with a long strap which converts it to a little cross-body bag. Love it! Happy birthday to me!
 
Eat, Write, Dream, Stitch


Thursday, March 1, 2012

She Got a Little I-Cord Happy

Knitting an i-cord is so fun and incredibly easy! 

I learned how to knit i-cords because I wanted to use them as the arms and legs of my cuddle creatures. But as I began knitting the i-cords, I sort of got addicted to it! Basically, you just cast on a few stitches onto a double-point knitting needle (I cast on five stitches for my creatures) and then knit the row, slide the stitches to the other side of the needle, and knit another row. Just keep doing this, sliding it back and forth, and you will have stockinette stitched a tube. (without going to the trouble of stockinette stitching, because you were sliding it back and forth, so all you had to do was knit)


Finally the day came when I had knit all my cuddle creatures that I wanted to knit for gifts and for the house (I may knit more later). But I wanted to knit more of those i-cords! So I did. Then I started looking at them, laying there side by side--this time I had cast on seven stitches for each i-cord--and I realized I wanted to sew them together in sort of an i-cord patchwork and make a little tote bag. It would either be lots of fun, or a disaster. But I did it anyway.

I-Cord Heaven!

I used lots of different varieties of the cotton sugar and cream yarns.
I think I had knit about 24 i-cords when I started putting my tote bag together. It was fun to lay it all out and see how these colorful cotton cords would go together to make a nice, thick, wonky little bag. With the same yarns, I just started quickly stitching one cord onto another to complete each side of the bag. Then I stitched the whole bag right sides together.
Lastly, I stitched on i-cords for the handles. The bag has a nice, sturdy feel to it, so I'm ready to make a bigger one! This was the test. I like how it turned out. It looks like something I bought at a street fair or something. Very fun! Here are more views of my little bag.


So, be sure and stash a little ball of yarn and your double-pointed knitting needles in your go-bag--you can knit on your i-cords while waiting in line, riding in the car, or visiting a friend. So fun!
Ahhh...a chair full of embroidered pillows!
Eat, write, dream, and stitch an i-cord, or maybe 20!

Saturday, October 30, 2010

Bag of Dreams


I finally finished my rustic little embroidered bag that began at a tag sale. Two soft white little embroidered blouses, 25-cents each, started this whole thing. They featured white on white embroidery, eyelet cutouts, and colorful stitching--I knew they had to be repurposed for something. I snipped out the pretty embroidered sections for my zipper bag, and used the backs of the little blouses to stitch together its rustic handle.


I embroidered the words "Bag of Dreams" onto one side of the bag, in pink DMC and stitched x's in a varigated purple DMC down the handle.


The other side of the bag has two swatches of fabric sewn in and more eyelet, along with a little cross-stitch heart patched on. A light teal linen serves as the lining.


A little fabric bag with layers and layers of color and embroidery, stitched together for a cotton country look--makes me want to find more embroidered blouses at more tag sales!


The blue zipper has a beaded pull added on as well. I think this will be a fun bag to hold some stitching and knitting projects on the go!


 This makes me both kinda sad and kinda happy--the last basil bouquet from the garden...the next day we had our first frost! That's okay. There's much more to eat, write, dream and stitch.


Tuesday, August 10, 2010

The I-Feel-Pretty Tote


Every girl needs a pretty little tote bag. This one has a definite case of the "dainties" with its toile fabric and white eyelet and ribbon trim. I think Shirley Jones may have taken it shopping in "Oklahoma." 

I am experimenting with making gift-quality tote bags, and this one turned out fine to my delight. I lined it with a green striped fabric I had on hand, gave it two fabric handles for sturdiness and included ribbon ties sewn inside for closure. It is ready for a leisurely weekend or a trip to the library, where all proper ladies take their dainty tote bags! (my laptop fits in it too!)


My shadow, Minnie, was my helper today. 
But she really tried to reposition my scrapbooking many times 
before I could take the picture. Good thing I had sewn the papers together!

Wednesday, August 4, 2010

Blue Jean Bag Queen

I found this style of embroidered flower in a book, and now I embroider them on everything! I use all different colors, and my favorite DMC floss--satin floss for these particular flowers.  But I'm getting ahead of myself.

I cut the leg bottom off of a pair of very old jeans, and left it in one piece. One side is embroidered with my easy-to-stitch flower and stem, and several ribbon bow ties are sewn on at the top (great way to use ribbons scraps). 
 

I stitched a fabric flower and strips of ribbon to the other side. Now here's the part I love--the handle is actually an Old Navy lanyard, sewn right into the bag, with the clip conveniently hanging off the side. I left the hemmed bottom as the top and stitched the other side closed. That's it! A cute, blue jean baby queen summer bag.


Stitching and dreaming.


Tuesday, July 20, 2010

Who Needs a Book Bag!


We couldn't find a book bag with owls! So it was time to make one. I had already been to two fabric stores, looking for owls. But on the third try, at our favorite new fabric store, my daughter found her book bag material.


I cut two 18X22-inch squares. She wanted a big bag with a very long single strap. I chose a brown check for the lining--we needed this bag to be as strong as possible. On one of the checked fabric squares, I sewed in a pocket with the owl design--double stitching for reinforcement. Owl fabric and checked fabric was sewn with right sides together. After turning out there was no need to stitch the gap because then the two lined squares would be sewn together anyway.


I cut a long 4-inch wide strap from the owl design, and pinned it in to let her try it out for the perfect length. Then, after folding the strap in half, sewing, and turning out, I was ready to sew each side into each side seam of the bag with the x-in-the-square typical strap stitch I use on tote bags.

We are happy with this nice, sturdy, big book bag in the fabric of choice. I see more book bag making in my future. It was a fun project and took less than two hours! I like that!


I have to say the inside pocket looks cute too.


Dream up something fun to stitch!

Thursday, July 1, 2010

Ribbon Bag Magic

What's so magical about ribbon bags? I can think of a few things. First, they're easy breezy to stitch up! Cut two squares, right sides together, and sew. Second, they stitch up fast! Third, totes are just so handy for anything from gift-giving to a trip to the pool to lunch. These ribbon bags can take care of your knitting project, spools of thread, a project's worth of DMC floss, little notebooks, and a trip to the farmer's market. You can't have enough! (so this time I cleaned out my scraps and made plenty) 
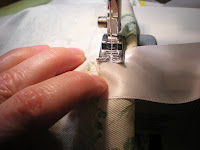
Here's the best thing about ribbon bags, the handles are ribbon! Ta da! It's a no-brainer. I use fabric scraps, old show shirts, vintage fabric, you name it, and then I pick a ribbon to set the whole thing off as a unique little tote. Make it whatever size you want (I often cut out a 14x10-inch square with a piece of 22-inch ribbon). After stitching the two squares of fabric, right sides together, fold the top down for a little hem, and sew in the ribbon handle on each side as you're sewing around the top. Put a few extra stitches into the handle to make it nice and sturdy. Turn it right side out and you're done!
While sewing one of my bags, I accidentally snipped the fabric with my sharp new fabric scissors while snipping off the extra threads. Oops! But no problem, I added ribbon to trim the top and cover the little snip, and it turned out pretty cute. In fact, you could do this on all your ribbon bags. It's just a little extra stitching for a lot more cute.

(tip: Buy ribbon on sale, and keep it hanging over your sewing area.)


I love the bag made from an old Nutcracker sweatshirt--what a great Christmas gift bag! 


Keep ribbon bags hanging around--you might need one on the way to the bookstore or the fruit stand.
I probably spent a total of three hours and made over a dozen ribbon bags. Since these are quick and easy, not lined or anything, I like to use pinking shears so that the seams do not ravel. At this rate, I'll never buy flimsy paper gift bags again! It's just as easy to use up my ribbon and fabric scraps and make one-of-a-kind, magical ribbon bags!

Eat, write, dream and stitch up something magical today!