Friday, April 1, 2011

Well Butter My Biscuit--It's Vintage Recipe Friday!


A proper Victorian woman knew biscuit-making like she knew how to accessorize a hat.

My vintage biscuit recipe is simply a very old family recipe for basic buttermilk biscuits with ingredients that probably already live in your pantry. 

The one rule of thumb to remember is, do not over-work the dough and you will have a light, fluffy, savory biscuit for any meal, any time. Now, when it comes to hats, feel free to over-work the accessories! I personally would love a new summer hat filled with flowers! Too fun.


Vintage Buttermilk Biscuits
Preheat oven to 450 degrees
Makes about a dozen biscuits

INGREDIENTS
2 cups flour
1 tablespoon baking powder
1 tablespoon baking soda
1 tablespoon white sugar
1/2 teaspoon salt
1/2 cup cold, unsalted butter chopped up
1 cup buttermilk
2 tablespoons heavy cream

INSTRUCTIONS
Sift the dry ingredients into a large bowl. Work in the cold butter until mixture resembles meal. Make a well in the center and pour in the buttermilk, stirring until a ball forms. Knead on a floured surface, gently, until the dough is formed and pat into a round about 1-inch thick. Use a floured, 2-inch round biscuit cutter to cut out biscuit rounds and place on a lightly greased baking sheet . Brush the tops with the cream and bake for around ten minutes or until golden.
Add a cup of shredded sharp cheddar cheese for a delectable dinner biscuit! Happy Friday!


Wednesday, March 30, 2011

Old Country Pizza Pie Dough

I imagine that when they make pizza pie, in the old country, the dough is as fresh as the pasta, the bread, and the air. Now that's pizza! (as my daughter says when I make this) I snapped a lot of photos when we made homemade pizzas last week. The recipe for the pizza dough could not be easier! Just give yourself an hour-and-a-half ahead of time for when you want your rustic country pizza to come out of the oven and get gobbled up.
I have also made many batches of the pizza dough for my daughter's sleepovers. We set up bowls and bowls of toppings, and each girl makes her own pizza. Now that's a real pizza party!

 Old Country Pizza Dough
3 cups all-purpose flour
2-1/4-ounce packets of quick-rise yeast
1/2-teaspoon sugar
 -------------------
Combine flour, yeast, and sugar in a mixing bowl.
----------------------------
1 teaspoon salt
1 tablespoon vegetable oil
1 cup lukewarm water
-----------------------------
Mix salt, oil and water with the flour mixture. Knead (by hand or with mixer dough hook) for approximately three minutes, until dough feels smooth, or starts to pull away from sides of mixing bowl and easily forms into a ball. Place the smooth dough ball in a large bowl, coated with olive oil (wipe dough around it) and let it rise until doubled in size; approximately one hour.

Punch dough down. For a large, 16-inch pizza, roll out the entire dough ball. For two medium-size pizzas, cut the dough in half. Wrap one dough ball and set aside. Let the dough you are working with rest for a few minutes, and roll it out. Place it in your prepared pizza pan (sprayed with non-stick cooking spray)  and form the crust, pinching around the edges. Spread on pizza sauce to your taste. 

Sprinkle on shredded mozzarella cheese, and/or cheeses of your choice. This time we made one four-cheese pizza, and one loaded with pepperoni. We've also made delicious veggie pizzas with mushroom, onion, and green pepper.

Place on the bottom rack of a cold oven, and bake at 500 degrees F for approximately 17 to 20 minutes--this will depend on your oven and the toppings. The crust should be golden brown--but not overly brown.
My daughter's favorite: 4-cheese!


Princess Minnie - supervising my seedlings.
I've got several cherry tomato plants I've started from seed. My favorite is Burpee's Sweet 100--those little tomatoes are the candy of the garden...so yummy eaten warm right off the vine, you almost feel like you're somewhere in Italy. I'm picturing a homemade pizza covered with them! That will be sometime in July. Hopefully, this is our last cold day in March. I'm ready to send all the coats to the cleaners and get out my sandals!

Good gardening...good eating!


Tuesday, March 29, 2011

Go find your happy place, and if you can't find it, make it.

 "Properly practiced, knitting soothes the troubled spirit, and it doesn't hurt the untroubled spirit either."

--Elizabeth Zimmerman


I feel like I have been knitting little squares for a long time, in-between things, during things, and anytime I was at risk of the dire possibility of being bored. That is really not a word in my vocabulary! These little guys are coming together, this week, into a unique little wall hanging.

As for my ever-growing stack of larger, 20X20-stitch squares, they are still multiplying into a nice throw. I vowed to stitch at least one square a day. I'm still working on yesterday's! Love it, love it.

EWDS.


Monday, March 28, 2011

Spring's Wings--It's "Every Inchie Monday"

Okay, first of all, there is snow on the ground this morning in the Ozarks! I don't think my radish seeds out in the garden are very happy...but other than that I am still going to celebrate today's Every Inchie Monday theme, which is "Winged," with my favorite spring winged thing: a butterfly.

Please visit the Every Inchie Monday blog for the most amazing art ever to grace one square inch at www.everyinchiemonday.blogspot.com.

This teeny tiny cross-stitch piece began when I was searching for something else...as usual...and this time it was a piece of black aida cloth which I need for another project. Looking at it I realized that a little stitched butterfly would really pop on that black background, and so it began. 


I designed my butterfly using yellow and green DMC satin floss, and stitched it up in no time at all. I knew I wanted the body to be beaded, and my little aqua beads were perfect. After sewing on the little beads, I trimmed out my one-square-inch.


 My silver DMC memory thread was also ideal for the antennas. And just like that, she was finished! I sewed a linen backing on the black piece of aida, and trimmed the corners with a bit of a bigger bead.

I dearly love this little butterfly, and I'm starting to imagine a bigger canvas with several of them flittering around and some flowers--so I've now got some designing to do! 

 
I'm also really starting to look forward to the time when I have a year's worth of Inchies to put together in one art piece! I've noticed other participants talking about that idea, and I can't wait to see what that will look like and what shape it will all take.

Ahh. Snow...shmoe...let the sun shine in!


In the meantime, I had seedlings to water on the greenhouse, and my little princess, Minnie, loves to help. She follows me and the watering can all the way down the greenhouse, and of course, has to water herself in the process. Helping Mommy is exhausting! My roma tomato seedlings, planted in mid-February, are getting hearty, and everything else is coming along. I've now planted the yellow pear tomatoes from my sister, so I hope this cold weather snap doesn't put my seedlings to sleep!

I just keep reminding myself, it is, indeed, spring! Although yesterday, the cold led me to mugs of hot tea with my orange blossom honey, and knitting--so I was fine. I watched a wonderful movie on PBS.org about the life of Dolley Madison--loved it so much, I'm going to have to watch it again. If you watch it, don't miss the special feature about the making of the costumes.
It's all good. Happy eating, writing dreaming, and stitching!


Friday, March 25, 2011

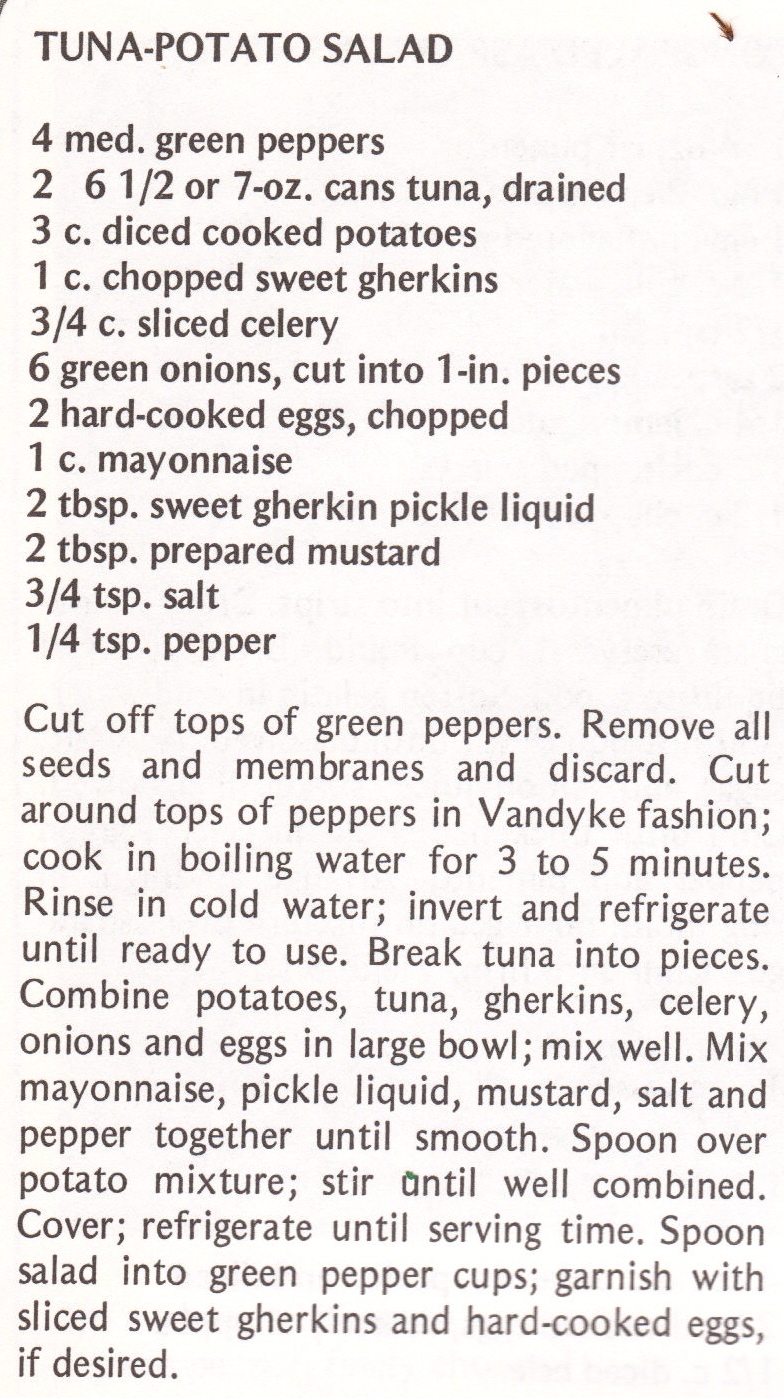
Vintage Recipe Friday - Salad Days

In 1976, America's Home Economics Teachers were feeling generous, and patriotic, and actually created a cookbook to celebrate our Bicentennial year.

I was a very young teenager then, but I remember receiving a copy of it at school, then put it away somewhere, and I guess it never saw the light of day for decades.

I feel guilty. Don't tell my homec teacher.

I don't know what it was about food photography back then, but I think it's a bit disturbing. In this photo, the refugee pickles look frightened of the giant tuna-potato pepper boats lurking over them, and I am quite sure that this lovely salad is much more appetizing than it appears here in black and white.


On another note--that is the tallest pitcher of ice tea I think I've ever seen! And the tablecloth has a very strange, almost alien texture. Well, enough of the photo critique!


I might change the mayo in this recipe to low-fat, and make sure the tuna is packed in water. But other than that, not a bad little salad. I am going to try it. I like tuna salad, and I like potato salad, so why not?


I love doing Vintage recipe research--some of the things I find are timeless and classic...other things just make me giggle, and jiggle like the jelled salad molds below from a 1950's booklet called "The Joys of JELL-O."

I don't know, it seems like a weird way to eat salad and the veggies look like they are in a Jell-O prison! It is very colorful though--almost like a set of Marie Antoinette's hats.


I would never make this in a million years. But it's very 1950's and very kitchy. It sort of reminds me of a family potluck Jell-O salad that one of my aunts would bring to the holiday dinners when I was little. I seem to remember it having pineapple, Jell-O, cream cheese and some kind of crunchy vegetable. I ate it and thought it was good--so go figure!

Yesterday my sister shared some lovely yellow pear tomato seeds with me, so I've got to get those started today--and most of my housework is done so I am hoping for some stitching time too, and I may even work on my novel a bit. The sun is trying to come out, and yet, winter is trying to stage a comeback this weekend!

Having all the little tomato, herb and flower starts on my greenhouse keeps me hoping. And these Jell-O molds keep me giggling!


 Salad isn't really salad, until it is fresh from the garden. Tasty veggies chopped up and drizzled with a little Italian dressing - yum. We'll keep the Jell-O for a little snack or dessert.


EWDS!

Wednesday, March 23, 2011

Leek, Laugh, Love

What do you do with those last few tall, hearty leeks from the garden? Make a little Leek-n-Shroom Penne Pasta I say! A bowl of this nice warm veggie-filled, bacon-topped pasta dish will make you happy. It's fast, easy, and delish!

This all started with me, clearing out a garden bed to plant radish seeds--those things love the cool March weather, and they will be done in four weeks, so I devoted one of the raised beds to my beautiful radishes--well, they will be radishes, soon. However, along with some stray plants and weeds, I still had three hearty leeks right in the middle of the bed that were from last summer--and those things stay all winter if you let them! I didn't have a dinner plan...so fresh leeks led the way.

Having been in the garden quite a while, it was really important to wash them well--slicing them length-wise first to get all the sand out under cold water.

LEEK-N-SHROOM PENNE

1-cook several slices of chopped bacon in a large pan
2-set cooked bacon aside, drain the pan leaving just a tiny bit of bacon dripping, and add two tablespoons butter and a splash of olive oil to the pan
3-Saute sliced leeks (about three) and add several sliced mushrooms--let saute a minute or two
4-Add about 1/2 cup white wine and let it reduce
5-After a couple of minutes toss in about 12 ounces of cooked penne pasta
6-Continue to saute and toss it all together, and serve topped with bacon bits and Parmigiano-Reggiano cheese


 I think I will have more roma tomato plants than I know what to do with! But they are some of my favorite for Italian dishes--especially pasta. I can't wait to eat from the garden again!


Monday, March 21, 2011

Inchie Monday--RHYTHM INCHIE

When you have rhythm--it's a sort of daily thing--you have it every day in every way. It's in a song you're singing with the radio...it's in your feet when you hear a Michael Jackson tune...it's in the flowers swaying in the wind...rhythm is engrained in the time of year and the way we go about our day. 

My teeny tiny Inchie!
This week's Every Inchie Monday theme, rhythm, is a fabulous theme to sit down and interpret in some kind of artistic way. Not to mention, a piece of art that must be one-inch by one-inch. (Visit www.everyinchiemonday.blogspot.com). My first visual thought of rhythm was Fred Astaire's tap shoes. But when you love someone like Fred Astaire, and you've watched enough of his dance performances, it all seeps into your skin and into your personal daily culture--it's more than the feet. 
So, back to the days. All I have to do is look at my calendar--the way I highlight, circle, draw, make notes (in spite of technology, I can't let go of my regular paper calendar journal)...to see the rhythm of my days. There's creativity, chores, plans, events, busy work, children, friends, family...there's a big star on the night I'm going to see Elton John! There's choir practice...sometimes play practice...and a definite void where there should be more violin practice. I love this, daily life thing...and so my Rhythm Inchie, the Rhythm of Days, begins with a piece of a calendar that used to be stark and white, and is now layered with the special, joyful, messy, mundane, fun, organized, musical, magical marks that symbolize the rhythm of everyday life.

I found the cutest lemon cucumber seeds this weekend--and a wonderful stash of beautifully inexpensive bulk seeds at my hardware store. Love it love it! Eat, Write, Dream, Stitch and Grow!