Wednesday, July 13, 2016

WOYWW 371 - Desk Delight


Planner girls talk about reaching "planner peace" -- basically meaning they finally find happiness with their planner situation, instead of feeling like the new planner they just bought is not working out every two months and then spending more money on a newer planner when the expensive one they bought in the first place has months left in it. Ridiculous, right? Why are they not happy with their planners all the time? I don't know. Well, I didn't buy a new desk. My desk is actually a big ole vintage wooden desk with vintage cubby shelves on top. I grew unhappy with it. I didn't dump it though. But what I did do was paint it all white. And then the other day I rearranged and organized everything again.

Thus - desk delight! My new term I made up.

I actually blogged about this yesterday too. So I won't go into it all again. But my "pretty box" organizing system on the side is working out very well. And having that little box full of things I use all the time is great because it stays handy and yet those bits and bobs are not constantly cluttering my desk. It is the "beautiful" box on top there and can slide right in and out, so I have constant access to it.
 
Lovely bits and bobs that would normally be all over my desk.

So today I had the planner out, and was looking at a tag I made awhile back...thinking of making more tags.

However, I'm busy with food this month for my daughter's cast and crew on a webseries she is shooting. Here's what happened to the box after I made the chicken for last night.


He has "box bliss." Have a wonderful day!

Eat, Write, Dream, Stitch

Monday, July 11, 2016

Your Dream Desk - Reorganizing Your Crafty Space

I do not have a dedicated craft room. Let's be clear on that. I was talking to a lady at a craft fair, and she told me that her husband actually bought the little house next door to theirs and gave it to her for her own craft space. So yes, someone on this planet doesn't just have a craft room, she has a craft HOUSE!
In a world where the tiny house concept is growing more popular and they want you to throw away all your stuff, I thought that was quite amazing. But back at my house, I do have a corner with sunlight, for my big ole crafty desk, and a couple of shelves in another corner for some storage. I know if my shopping got out of control I could fill a house though. Lately, however, without doing it deliberately, I've been on an unofficial no-spend--just really curbing my urges to run wild at the craft stores. I've been busy, and I don't want to spend what little time I have to craft, out shopping. It's a time thing--but I love to shop. Instead, I focus on projects and reorganizing. This really helps. Anytime I reorganize, I find cool stuff and better ways to both store it and have it at arms length.

I think the secret to having your dream desk is:
1 - Good Organization
2 - Colors You Love
3 - A Cross-Functional Space
4 - A Bright and Clean Space to Work and Be Creative
Organization
The secret to my reorganizing is, I know everything has its place, so I let the stuff tell me where it wants to go. I keep like things together as much as possible. I use the pretty box method of storage a lot (you know, those pretty boxes you can get at Michaels or Home Goods)--but I also stick a posty on those boxes so I don't forget what I put in there when they're stacked up! You have to reach that balance of "stored away nicely but still at your fingertips." It's not easy to do. If it's too stored away, you'll forget about it. If it's at your fingertips, it could be sitting around in your face and in your way. The pretty boxes are just the right sizes for me to reach that balance inbetween. I also have a smaller pretty box that has the odds and ends things I am currently working with, but also like to put away.

Colors You Love
A lot of people comment on the pink cutting mats on my desk. I've come to realize that the colors that make me feel the most happy, relaxed, and creative are pink, white and gold with some purple and mint green thrown in. Maybe these are my summer colors, or my colors of the moment, but building the look of your desk with your chosen colors is important. It's inviting, so you'll craft more. It's inspiring, which frees your creative thinking. And, your desk is you--it should reflect that in every way.

Cross-Functional
I used to keep my cosmetics in the bathroom. For years! But as I've collected some of the nicer palates I have, I realized that the bathroom is the worst place to store your makeup. I've never had a vanity though. I'm a craft desk kinda gal. Sooo...my craft desk became even more cross-functional. It is a place where I make things, I write, I do work things, and now with the purchase of a great little mirror and some acrylic storage, I can do my makeup there too. I love it. In this recent reorganization, I switched it all to the left side so now it's even more out of the way of my main workspace, and my mirror is hidden when I'm not using it. If and when I do get any more cosmetics, I've got room to go more vertical with my storage. And speaking of vertical, don't forget storage on the walls. I have a hanging pocket organizer there on the wall, meant for jewelry, but I use it for craft supplies that stay handy!

Bright and Clean
With all that play at your desk comes the work. Keeping it bright and clean. The first thing I did a few months ago was to paint my desk and shelves white. I couldn't believe the difference, and it made me so happy! It completely brightened up my crafty corner. With the mix of wood and acrylic storage on my desk, I found this multi-surface cleaner that is so easy to keep on hand and use, so my desk can stay clean, my clear storage stays sparkly pretty, I can wipe down crafty tools and supplies, and I don't have to bring out fifty products to do it!


Even if you have cubbies, shelves, and places to put things, you have to be careful not to overstuff. Any little organizers I have can get so quickly overloaded. When I was doing this cleanout/reorganization, I had to unload a little letter sorter I had filled up with all kinds of list pads, paper scraps, and bits and bobs. It was driving me crazy to look at it, and I didn't even realize that until I unloaded it. I only put back what I really wanted to look at and use. Now it holds my two coloring journals, my often used listbook, and some journaling cards I'm encouraging myself to use soon.


And one more thing...
You are special. Keep some flowers on your desk! I got my flowers at JoAnns...that's right, they're not real. (Real flowers could actually create more mess) But I think they are so pretty, welcoming, and make my desk look a little more special, like someone special lives there.

Eat, Write, Dream, Stitch


Thursday, July 7, 2016

Making Fun Paperclips from Your Stash

Flagging your most often used sections of your Midori traveler's notebook is easier with decorative paperclips. And let's face it--you can use fun paperclips as bookmarks anywhere in any book, planner, or journal. You probably have everything you need in your stash to make some for you and your friends.
If you have a zillion of the colorful paperclips, you can make them decorative with anything that's somewhat flat. See the cute glittery dress in the center? That came from an old toy stash I had found from my daughter's toys of the past--it was a pretend cookie from her American Girl doll stuff!
I use cute buttons, big sequins, silk flowers, and I've made paperclip flags with glitter washi tape too.
Hot glue your decoration at the top of the paperclip, opposite of the clipping end. After it has cooled, add a little piece of washi tape on top of where you glued on the back to secure it and to cover up the glob of glue. Another way to make it cute on both sides is, for example, glue a silk flower on one side and a button on the other side which then looks like the center of the flower. You can also use a piece of jewelry if it's somewhat flat--I could fix a cuppa tea and make these all day!
Put a scrap piece of paper under your glue gun to catch the drips of glue.
It's also a great idea to keep a few extra clips in your planner along with extra stickers and post-it notes to use on the go. Be creative, have fun!
Eat, Write, Dream, Stitch

Wednesday, July 6, 2016

WOYWW 370--The Craft Boss Is Back

Happy What's-On-Your-Workdesk Wednesday! 

I am planning, doodling, sipping green tea, making paper clips for my midori and stitching. I'll post more about the paper clips tomorrow. My inner craft boss is back and she is on a roll.
The Midori I made from an old leather Coach bag
And for other reasons, with my busy family, I'm having a busy month! And I think my tomatoes need watering. This may be my shortest post ever, but I want a little time to visit your desk. (calm down tomato plants, you can wait another hour) I hope you have a wonderful week, keep your joy, and do the thing that lights you up.
Working on the July room in the dollhouse 12-room cross-stitch--look at me go!

Eat, Write, Dream, Stitch

Tuesday, July 5, 2016

A Second Life for Your Outdated Planner - A Forever Art Journal

Well it's that time of year when you may be splurging on a new planner! I have to tell you, I've been a planner girl since the only planners out there were boring ones! I made my own from those cute cloth-covered journals back in the day...that's how desperate I was for planner peace before I ever heard that term. Now, you can find beautiful, colorful, fun planners in all colors, shapes, sizes, and prices! I think it is a little hard to spend on the luxury priced planners since they will be outdated next year. And what if you get tired of it before that? What if you didn't find "planner peace" and you spent eighty bucks on an Erin Condren?

So think about it before you rush out and buy the latest planner trend. Think about its function in your life, if you'll really use it, and what you will do with it later? Toss it? Keep it for decades? Do you have the space? It is worth shopping around and thinking about it long term.

I often use an Orange Circle Studio planner, and the one I was carrying in my bag for a few years in a row was small, but the pages were art journal themed. I thought it was gorgeous, and it cost just twelve dollars for the weekly page layout and it was filled with places to write and journal things. So when its time was up, I couldn't bear to toss it. After a couple of years, I took two of these journals and upcycled them into a forever art journal. I stitched and glued some of the unused pages together, added beads, ribbon, and now after having this homemade journal for a while, I realize how much I love it. I keep my favorite bible verses in it, thoughts, and ideas. It's like an inspiration book. But I like to call it, a forever art journal.

See how I upcycled my planners here

So I wanted to remind you, that your planner can have a second life, a restaging, a do-over. Just pick the right one in the first place, and you could enjoy it for longer than it was meant to be. When its time is up, you could rip it apart, take the best of it, and stitch together your own forever art journal. Get out the glue, floss, glitter, buttons, ribbon...whatever you like, and have a great time knowing you spent your planner money well.

In the meantime, Orange Circle has come out with a new version of their gorgeous planners on Amazon, and I've got one preordered that starts in August for around eleven bucks I think it was to preorder. I have no idea what the inside actually looks like, but I have faith because I love their designs. This is going to be my office planner, and after that, well, you know what!


Eat, Write, Dream, Stitch

Wednesday, June 29, 2016

WOYWW 369--Paper Fun and Making a Midori

Happy Wednesday to you!

We are celebrating What's-On-Your-Workdesk-Wednesday, hosted by our lovely Julia...and temporarily co-hosted today by our lovely wonderful Jan. Julia is recovering from an operation and we are all thinking of her and praying for her healing and comfort.

On the desk is me cutting pretty papers. *sigh* I could cut and glue pretty papers all day. I love it. This is from my Hello Darlin' stack and it's all kinds of adorbs. I'm decorating a couple of booklets for my Midori which I had ordered from Yellow Paper House. The covers are the sturdy brown craft paper which I love, because then I can decorate them all I want!
The Jan-June 2017 planner I'm adding to my Midori.

Although I have dearly loved my "doll-dori" which is my fabric Midori I made last year with the matryoshka doll fabric...lately I've been craving a stuffed chunky leather Midori. I decided to see if that's what I really want because if I bought one, it's not cheap people. So I upcycled an old leather bag and Bob's your uncle--I have a leather Midori. You can check it out on my blog post right before this one from Monday. 

WHAT THE HECK IS A MIDORI!?!
If you haven't heard me going on and on and on about how much I love a Midori Traveler's Notebook, it is basically a notebook that can house several different booklets, and it has a big elastic loop that keeps it all together so it's great for taking with you. They come in many sizes. In mine I keep a "side hustle" book for ideas and organization of my freelance writing and crafts, then two six-month planner booklets, a six-pocket folder I made with a dashboard to keep a little supply of post-its, a list book which is my everything like a personal assistant, and then my food and exercise journal. It really is my life all in one place! Plus, I really manage to keep my food and exercise journal on point by always having it with me. I separate the days with washi tapes and a fun Smashbook date and phrase stamp, so what could be a very boring journal is kind of scrapbooky and therefore I reference it a lot more than your average food and exercise journal which is bound to get abandoned and not kept up with because without washi tape, stamps and stickers the days all blend into oblivion.

Basically it's called: making life fun!
A unique leather Midori from an old bag. (I mean the purse...not me)
I must visit you now! Have a wonderful week.

Eat, Write, Dream, Stitch

Monday, June 27, 2016

Upcycling An Old Leather Bag Into An Everyday Midori Travelers Notebook

 I don't know if I have to tell you how a Midori Traveler's notebook can be your best friend, personal assistant, organizer, art journal and planner...but you may already know! I love making my own Midori style notebooks from the covers to the inside booklets themselves. And even if I order a booklet for my Midori, like I did recently from Yellow Paper House on Etsy, I will also decorate it with my scrapbooking supplies and make it one of a kind.
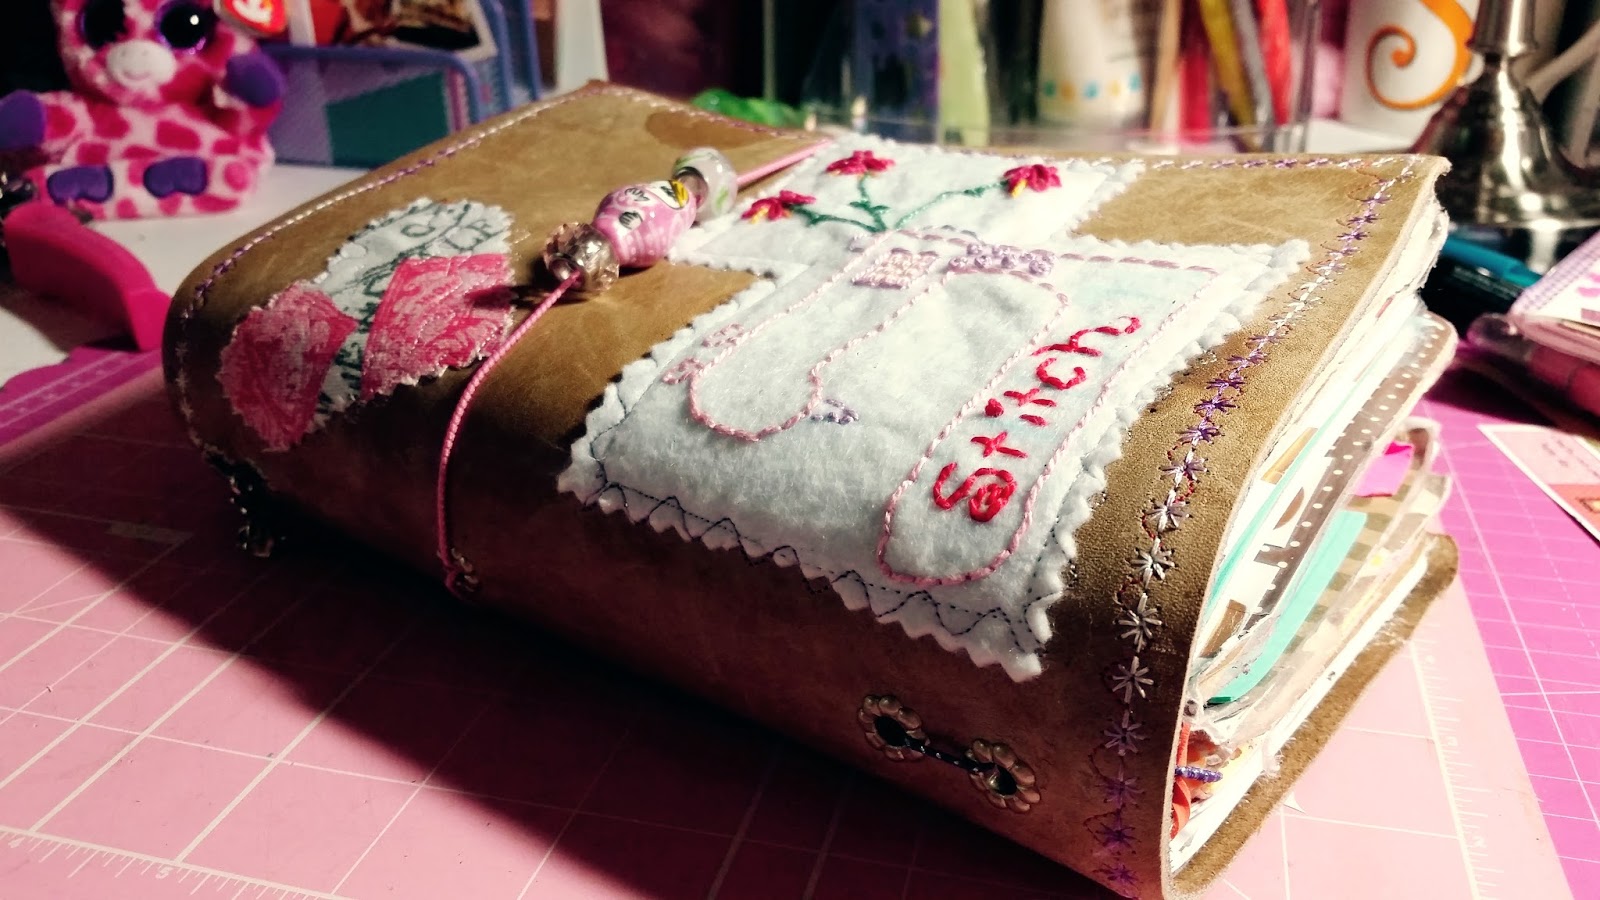
So this past weekend, I was in the mood to make a real leather Midori style notebook, and I knew my leather source would be a 30-year-old Coach bag that I had never let go of. (I'm all about upcycling) When I graduated from college and got my first job, I really wanted a nice bag, and Coach was the thing in the 1980's. So I have never let go of my first Coach bags, and my big brown one was well-loved, let me tell you. WELL loved! I was running from the beach in a rainstorm one day when I got a huge watermark on my bag, and it never went away. That whole side of the bag looked especially loved with more than one watermark and wear on the leather, so that's the side I cut first to make the Midori. It measured 9X12. Perfect for cahier size. My next question was, what to do with the love, the watermarks, and the imprints where the bag handles had been. I would have loved it to be just a perfect piece of leather...cut it...put in the grommets and done! I certainly could have just left it with all the love and imperfections--nothing wrong with that! But the more I thought about it, the more I actually wanted to applique where the handle had been and add decorative stitches. But could I sew on this leather? And sew, I did.
Well loved leather bag reborn into a newly loved Midori
First I cut out the whole side. Then I took a seam ripper and took off the handle. I took my ruler and rotary cutter to straighten up all the sides and then I put the approximately 9X12 piece of leather in my sewing machine and put a decorative stitch all around the edge, first with some red embroidery thread, and then with a purple variegated thread. I loved it.

I looked around in my stash for what to applique. I'm always embroidering on pieces of felt, and I'm always cross-stitching something. So I found an embroidery to applique to the front cover, and some fabric to make into a heart, to cover a little cut in the leather on the front cover, and then a matryoshka cross-stitch for the back cover. Of course, I have to have a matryoshka doll on there somewhere!

After I had all the stitching done, it was time to add the grommets--one goes in the center back spine, two at the top spine, and two at the bottom spine. This is because I like to have two pieces of elastic on the inside so that I can add a total of six booklets. With such a piece of roughed-up well-loved Coach leather, it was fun to add these decorations, and it made me want some pink sparkly elastic for the closure with some cute beads added.

Appliques all stitched.
I use a piece of 18-inch elastic and thread it in double and tie a knot.
You can see on the inside cover where the handle had been!
I have to say, making a fabric Midori does take a bit longer than this leather one. There is much more cutting and stitching involved, and there is a liner, more ironing, and I add pockets and pen loops with fabric Midori's. With this one, I will just add a binder clip to keep a multi pen on there. I made a six-pocket folder for the inside with a dashboard, so no pockets needed on the inside cover. (more about the insides in another post!)
A c-s matryoshka appliqued on the back cover--there's an old stain I left exposed.
Remains of the day--the bag, now cut up--there's another good piece of leather!
Honestly, if the hardware on this  bag had held up, I don't think I would have upcycled it like this. But it was just rusty and gross, and now I'll basically be using this bag in its new life every day!
I add a charm to the back too.


Although I covered up where the bag handles had been, because I thought it looked odd, I don't mind having all the imperfections in the leather showing. To have a big ole water stain reminding me of running from the beach in a rainstorm when I was young, not bad! Midori's are all about memories and planning for the day and the future. Mine is very personal.

See other Midori posts here:

Making a "baby-dori" from Coach leather
Making and decorating Midori booklets
Stitching a fabric Midori and decorating booklets for it
Planner peace in your Midori

Eat, Write, Dream, Stitch