Showing posts with label Matryoshka dolls. Show all posts

Monday, October 5, 2015

Planning...Listing...Doodling and Decorating in My Midori

I have called it a Midori, Fauxdori, Dolldori, and Stitchydori -- but whatever it is fits me perfectly in every way. And it's like having both a personal assistant and a muse.
Stitched with matryoshka fabric plus a little doll bead on the elastic
Classic Midori Travelers Notebooks measure 4.33X8.25 inches, are made of leather, bound together by elastic and can hold anywhere from one to six booklets.
Backview shows off the pen loop stitched in with a piece of elastic, and how I left on the selvage edge of the fabric.
I stitched up my own Midori at first and realized it wasn't fat enough for me! I love using my favorite fabrics, lining them with felt, embroidering in them for wearable art, and even making my own planner and booklets for the inside. So I didn't mind taking the matryoshka fabric I love (for my "dolldori") and trying out the bigger size of 6-1/4X9 inches. After a month, the results are in:
     I LOVE this bigger size
     I LOVE planning in my Midori
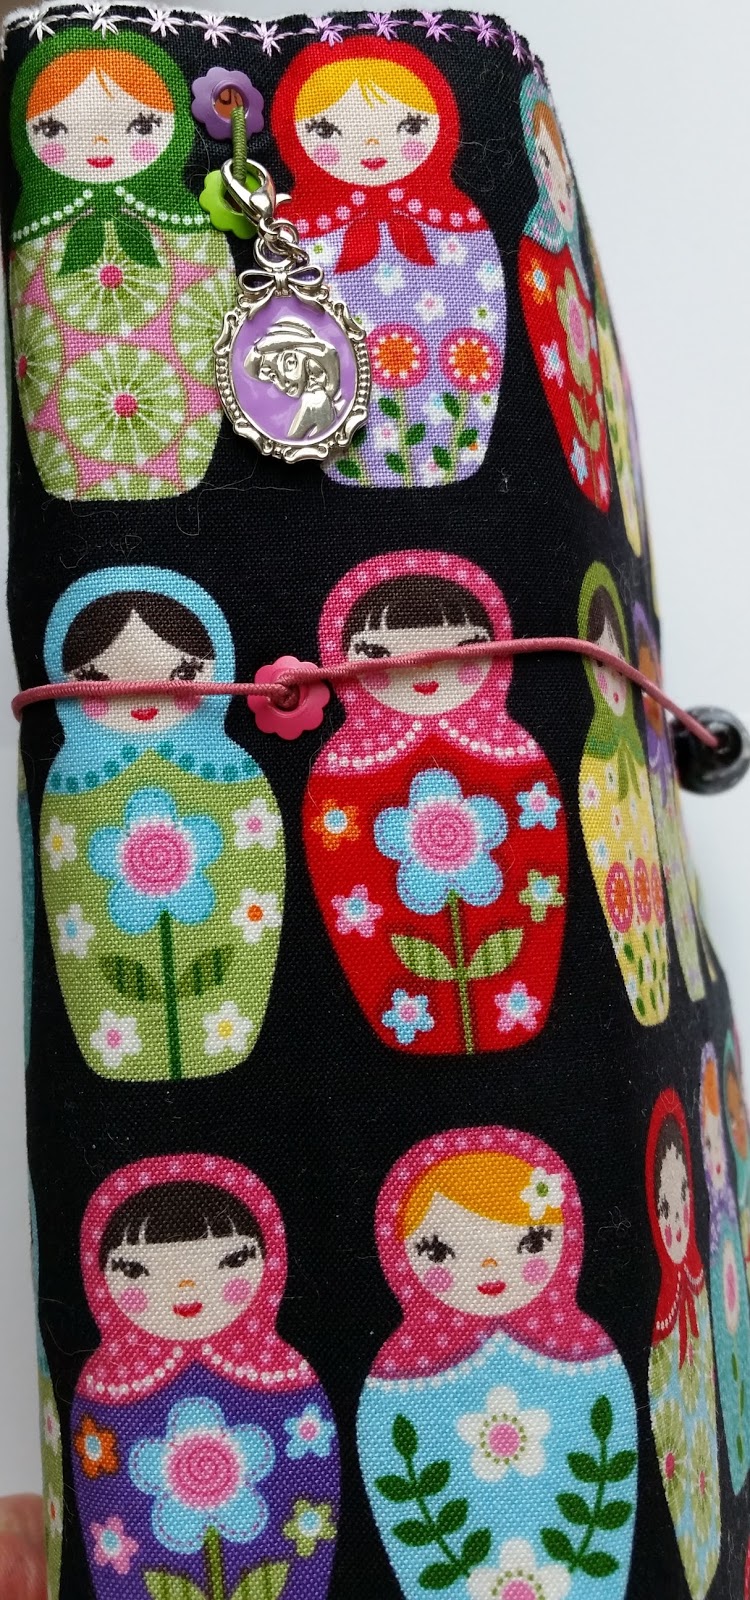
 
I decided to punch all the holes in the spine--I added another charm at the top

I like the larger size because I stuff my Midori fat with five booklets, a six-pocket folder, a clear plastic folder and a dashboard. That's a lot. But it makes me feel like my planner and craft room and listy notebooks go with me everywhere. My Midori has two elastic straps.

Here are the first three books on the first strap.
Inside front cover pocket - and my weekly planner
 
First book: Weekly planner - six months at a time

A planner page with lists, to-do's, some stenciling, stickers, and daily prompts for a Midori Instagram challenge I was doing.
This was a free downloadable planner and it was fairly easy to print up. I make my covers with plain white cardstock and decorate them with stickers, scraps and diecuts, and protect them with washi tape and packing tape.
I do have more than one planner--like a lot of planner girls. I think I'm one of the original planner girls, I just didn't know it. Anyway, my dori planner has really become my go-to planner. I like to write down my usual planner things, but then when I'm doing that there are ideas and thoughts that belong in other booklets, and I can go right to them, yet keep it all together. The nicer lettering is done with stencils I keep right in my Midori, purchased off Amazon. I've also used washi tape to tip in some food journaling sheets in the back of my dori planner--so far, I'm sticking to it!
Junky listy book front cover
Book no. 2 is made with multi-color lined pages. I've put a table-of-contents in all my booklets and this one is dedicated to ideas for my side hustles, like my Etsy shops, writing and craft selling.
My junky listy journal
I call book no. 3 my junky listy journal. I made it from a pad of yellow lined paper, and it's a shorter width than the other books' pages, but perfect just for all the lists I keep. You know you're a major lister when your lists have a table-of-contents!
You can see where the two straps are here--Art journal front cover

Inside my Midori art journal

 The first book in my second strap inside the Midori is the art journal I made out of watercolor paper. It can take wet and dry medium and plenty of sticking and gluing...that makes it my therapy, my yoga, and a way try out ideas for all my arts and crafts.
Triple duty dashboard--front cover

Dashboard inside cover and six pocket folder inside

Another angle of the folder inside the dashboard
Clear plastic folder inside six pocket folder--also where I keep my stencils
Dashboard back cover with swingout washi tape pallet
The second book on my second strap does triple duty. It is a dashboard folder (laminated so it's a place for extra post-its) and inside is a six pocket folder (made with a tutorial on YouTube) and inside that is a clear pocket made from colored pencil packaging. On the backside of my dashboard folder I hinged a washi tape pallet using my crop-o-dile and a grommet. I cut and upcycled an old plastic planner cover to create my pallet so that I can keep washi tape samples inside the Midori. Is that the hardest working dashboard you've ever seen!
Last booklet: A place for quotes and thoughts
Inside back cover is embroidered - wearable art!
My last booklet is a place for random quotes, thoughts and inspirations. When I need a boost, I go here. When I can give myself a future boost, I go here.

I like the feel of lining my stitchydori's with felt, and for my own dori, I took the time to embroider for the inside back cover. It says, love your life and it has my signature typewriter with the flowers. When I open my Etsy shop or sell dori's in a local shop, some of the stitchydori's may have applique or embroidery on the inside back covers. They will all be unique and one-of-a-kind. My goal is not to be a manufacturer, but a creator.
My one-of-a-kind dori with the selvage edge on the back, and trimmed in machine embroidery
And that's the end of this doribook. Stitching my own Midori meant doing whatever I wanted, like leaving the selvage edge on the back of the fabric (I'm a weird sewist who loves the selvage edge!), and embroidering what I wanted, and putting the grommets in the best place and adding the charm and bead and places for my quatro pens. Once I started trying it out, I quickly arrived at the best way to package my life-in-a-dori. Making and decorating my own booklets just makes me happy, the way scrapbooking and art journaling make me happy. Just good art therapy for the soul.
Yes, I also made a matryoshka bracelet
I like it so much I'm creating more, just for fun, with owl fabric, Mary Engelbreit fabric, and a Santa Clause print that's super cute for Christmas time. I don't know how I got hooked on this, but I think it started with my journey for planner peace and ended up with Midori peace. It's like stitching and scrapping combined.

That's why art and crafts can change your life. Future plans include making a floss and needle holder for my Midori for cross-stitching on the go. There's no end to what you can put in your Midori, if you're creative enough.

Stitch happy!

Eat, Write, Dream, Stitch


Thursday, July 30, 2015

Matryoshka Bobbins--Make Your Own Custom Paper Bobbins


I'm a little mad about Matryoshka dolls. I love how they are painted. I love that they nest and there can be so many of them all packaged up. They just make me happy. I collect the nesting dolls, I recently cross-stitched some, and I'm stitching projects right now from the cutest fabric Matryoshka print. I have a Matryoshka coin purse, tote bag and matching notebook I've turned into a TV recipe book, and today I made a few paper bobbins.

Super easy. I found this Matryoshka printable (check Etsy and Pinterest for your favorite paper bobbin designs), printed them on Avery shipping label sticker paper which can go right through the printer to make stickers, and stuck a sheet of six onto a folder I was upcycling. I fussy-cut those out, then cut out the other sticker sheet of six to put each one on the back, and wallah. Matryoshka paper bobbins! Perfect for those extra skeins of floss or pearl cotton.
 Eat, Write, Dream, Stitch