Showing posts with label embroidery. Show all posts

Tuesday, October 11, 2016

Crafting in the Cosmetics Aisle...a little Tuesday tip

This is a little reminder that you don't have to shop at the craft stores for everything in your crafty corner of life. I happen to love all the new rose gold that's been appearing everywhere. And I needed a little embroidery bag to throw in my work bag every day. BUT...I really wanted one with rose gold hardware. It just makes me happy.

I was in the cosmetics aisle, though, not the craft store, and I found a whole new inexpensive line of cosmetics bags from Flower Beauty--the new brand by Drew Barrymore. The best thing, besides the price, is the gorgeous oversized rose gold zipper pulls and hardware! So cute. I just picked up this little one for now, and then right there in the same aisle, I found rose gold stork scissors! What?!? As someone who threads a needle every day, I love my little gold stork scissors. But these rose gold stork scissors are adorable. They're meant to be brow trimmers, but now they are repurposed as another pair of embroidery scissors, plus they look cute in this bag. Boom!

It's just those little daily things that can bring us extra joy--so why not find what you like and repurpose it! After all, my favorite travel craft bag is an Orla Kiely diaper bag! And I left the actual diaper bags years far behind me! But let me tell you, nothing has more pockets or is built more sturdy than a diaper bag. Makes you rethink what you need and where you shop for it!

Eat, Write, Dream, Stitch

Tuesday, February 2, 2016

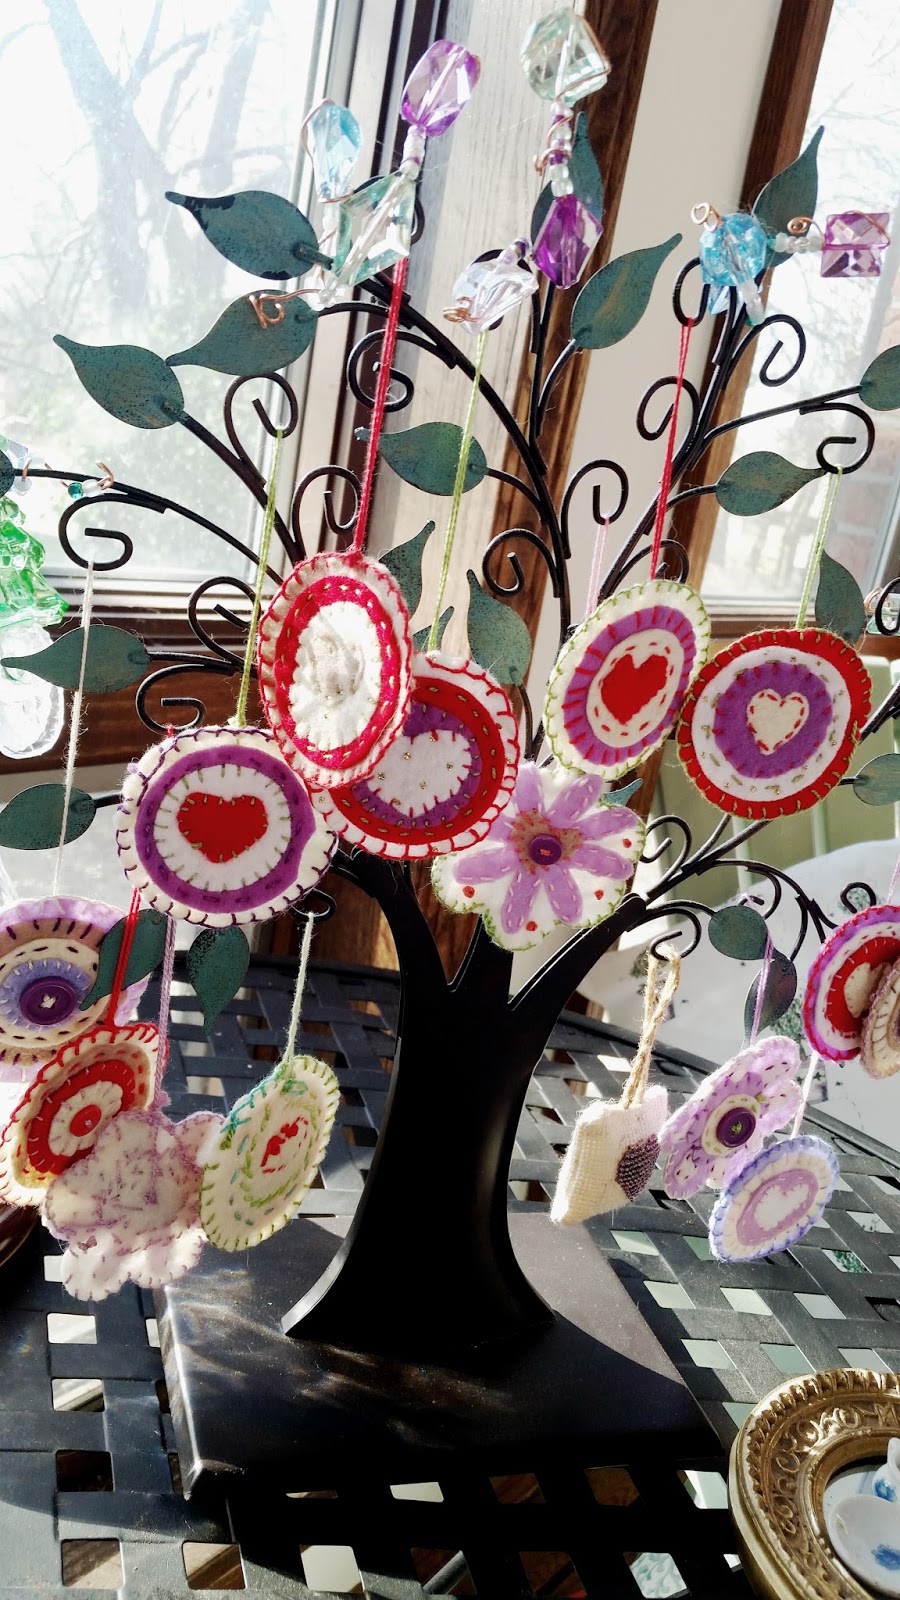
Valentines Tree

There are many things you could upcycle or recycle to create the base for your Valentines tree. And if nothing else, snap off a few tree branches, paint them white and add glitter! I have done that, but this post features an upcycled photo tree purchased many moons ago from the Hallmark store.
Some stitched felt, sparkly beads and wire, and a few cross-stitched hearts transform it into a Valentines tree!

See here for more about stitching felt hearts on diecut circles.

Stitching frippery is a great on-the-go project. Just diecut your shapes ahead of time, pack some pearl cotton no. 5 floss and you can stitch up your cute frippery everywhere you go.

 Be sure to use a small length of floss to make a hanging loop on each ornament, and then get your tree base ready. A few cut branches in a tall vase would make a stunning Valentine tree display. But I was about ready to get rid of this old Hallmark photo tree when I decided to transform it. The original idea from Hallmark was that you would buy their teeny tiny ornament frames, and somehow come up with teeny tiny versions of your photos to hang on here. Well that was never going to happen--I could barely see photos that size without my glasses! This tree is metal, and with all those little hooks on it, there were definitely other possibilities.
Playing with bead and wire is one of my favorite things. These gorgeous, sparkly acrylic beads, I picked up at JoAnns, and a little copper wire turned into some pretty accents for the top of the tree. Sitting on my sunporch, they catch the sunlight and make the whole tree sparkle. I think eventually though, I may just spray paint it all gold.
Beads and copper wire
When I start making these little beaded wire treasures, I realize I can use them for a lot things.
This will make a cute bottle to root plant starts
From my felty frippery heart to yours, I hope you make a Valentines tree this year and enjoy your heart day.

Eat, Write, Dream, Stitch


Tuesday, February 17, 2015

Embroidering Ephemera on Tag Tuesday

 We have had a lot of fun opening up our new Etsy Shop! I found some great tutorials from Renae Christene on YouTube. Our shop is called Vintage Post & Paper and it features authentic vintage ephemera with envelopes and postcards postmarked from the late 1800's to the early 1900's. I even managed to figure out how to add the Etsy mini to the side of my blog here. Woo hoo! Feel free to click on it and visit my shop!
I have a few from our vintage collection that I plan to alter, including this envelope with the two-cent stamp from the 1930's. I was embroidering on it when I realized it wanted to become an art tag! Today's theme over at Tag Tuesday is "text" and I can only imagine the text that was on the vintage letter this envelope once held.

I have seen vintage ephemera in a wide variety of altered art, mixed-media, embroidery pieces, framed pieces, and even scrapbook pages.

It was fun to make this unique 80-year-old envelope into an art tag.
 I actually found some envelopes in the collection that were from the year my mother was born, and those are now special to me. I plan to find a way to use them with mother's photo - I don't know if it will be a scrapbook page or an art piece. I usually find out after I start working on it. 
We will continue to add these postmarked vintage envelopes and postcards to our shop as we go through the collection. Our tagline is, "A tale of mail carried long ago." I love that, because all vintage mail tells a story. And let's face it, when's the last time you wrote and mailed a real letter to someone? A personal letter. (let's think Jane Austen here--someone writing about the joy of buying cake.) 

Real mail is becoming rare. It's truly special to see it live a new life.

Happy Tuesday!

Eat, Write, Dream, Stitch


Monday, November 3, 2014

Bee Vintage

 In the boxes of precious vintage sewing patterns my sweet mother left me was a jewel: a stack of embroidery transfer patterns she bought back in the fifites and sixties.
The first one I laid my embroidery-loving eyes on was the Vogart bees. I'm in love with them now. I immediately fired up the ole iron, and guess what. They still transfer!
I think my favorite thing is looking at the transfers that mother bought two and three copies of the same thing. Those are the ones I know she really liked. I love imagining my pretty young mother embroidering her sweet tee towels for the kitchen, pillow cases and tablecloths. I know how stitching makes me feel peaceful and happy and that's how I like thinking of her.
This was 29 cents when mother bought it!
  
How cute are these.
I can't believe I had never noticed all these in her sewing stash before. Such a happy surprise.

Lots of sorting to do.

Eat, Write, Dream, Stitch.


Tuesday, September 16, 2014

Embroidered Wristlet - Doodle Stitched

 Happy Tuesday. A morning with my favorite coffee and a little embroidery really does make me happy. This time of year you see all the ready-to-decorate bags go on sale in the craft store. I bought a very plain little wristlet--but the sale price was so good, I could have never constructed it myself for that price and it's nice to save a few steps. I'm having so much fun doodle stitching all over it, I will need to buy a few more for Christmas gifts! I just pulled out my basket of on-the-go embroidery, where I mostly use #5 cotton pearl flosses, and I just start stitching. You can't go wrong, because the more you stitch, the better you get. If you just know a few basic stitches, you can doodle stitch all day! 
My embroidery basket goes everywhere with me

First I removed the wristlet handle, and ran it through the sewing machine, using a flower stitch and variegated purple thread. I'll add some ribbons and beads to the handle too--a true diva bag!

Then I put a few rows of machine stitches around the top of the bag itself with the same purple variegated thread--I think it's Sulky brand. I appliqued a diecut heart, from my stash of diecut fabrics, and then I just started stitching. I'll share it when both sides are done! I love having an ongoing little project like this, and the best thing is, I'm creating wearable art. I'll get to share my embroidery with anyone who sees me using my little bag!
The basic wristlet
Stitching around the top with a decorative machine stitch
Forgot to mention - I added a trim to the bottom
A whimsical heart, appliqued and embroidered, and a butterfly!
 I'll be stitching the daylights out of this little bag, and you won't recognize it. More to come!

Eat, Write, Dream, Stitch Happy


Monday, June 9, 2014

♥Daily Bliss Banner - Day 1 of 8 - BLISS

I love those "make-something-a-day" challenges. So, I'm challenging myself this week. I call it The Bliss Banner Project. I got the idea from Quilting Arts on PBS, when one of their guest sewists was making a prayer flag a day. I do pray. I tend to do more thanking than asking. In a spirit of thankfulness I wanted my banner to absolutely make me happy every time I look at it and that's how the Bliss Banner thing was born.
Working from stash

Here's my five simple rules:
1-Each little flag in the banner is about 5-1/2X11-inches--I really like that rectangular size.
2-Do not buy anything. Everything for a Bliss Banner comes from stash, upcycling and creativity! Part of the fun is knowing the origins of each.
3-Try not to spend over one hour on it.
4-Hand stitching, machine stitching, doodle stitching, applique, stamping, mixed-media, painting--everything goes.
5-Stitch or write a happy word onto each one.

If you happen onto my blog and like this idea, please leave a link to your Bliss Banner in the comments--join in on any day. There's something about being creative just for the sake of being creative that keeps all the other ideas flowing!

Here's my Day 1 Bliss Banner. Of course, my first happy word is "Bliss." It began with the top of a vintage pillowcase from my precious mother. The crochet edge was getting raggedy--but I was able to work with it by just stitching it down. It would have been okay just to leave it raggedy too. I folded over one inch on the top for the border and handstitched it with pearl cotton floss. I stamped on it in a couple of places and added some pink buttons. I appliqued a scrap of an old bookmark I had once stitched. This pillowcase top already had a big pink embroidery on it so - bonus! I like knowing my mom's head once rested on this.
Eat, Write, Dream, Stitch Happy

Thursday, May 29, 2014

Listen to the Floss Lady--Making Your Own Floss Cards

There are so many great ways to store your embroidery floss. I have a huge DMC Stitchbow organizer - which I plan to blog about soon - and I always have a cute basket of clothespins (click here to see that blog) with floss wrapped around them. But when I was doing a reorganization of my Stitchbow binder and had some extra skeins I didn't need to go onto the Stitchbow floss holders, I decided to card them up. And, if you know me, I always have to do things a little differently--I found a cute free download on Pinterest for a floss holder (just search, there are many) and I printed it, glued them onto a heavy black cardstock and cut them out.

Then, I started doodling on the black cardstock! That was fun. A good creamy white gel pen makes it easy. You can doodle little sayings - your initials - or the floss numbers. I'm also using these little cards for miniature cross-stitching kits that fit into my bag so I always have something to do! It would make a cute gift for your stitching friend too.

I don't know if I like the back or the front more!
Eat, Write, Dream, Stitch, Floss Daily

Monday, March 17, 2014

Stitching in Color and Fabric Scraps

Lately I've been practicing some of my embroidery stitches on pieces of felt. Embroidery helped calm my nerves through a tough time this winter. It's so expressive, yet so comforting. It's also social, because I'm not following a pattern, just making up my own thing, so I can visit and stitch at the same time. On these pieces it was fun to use fabric scraps and buttons too.

I finished another little patch -- so I think these are going to be little art quilts eventually. 

I have been using pearl cotton #5 flosses, because I love just knotting them around a floss holder (either a metal ring, or I also have actual floss holders, a lamb and a peacock) and by cutting the skein in half, all I have to do is pull out a strand and it is ready to go, it's the perfect length and there's no separating to do.
This basket-o-happiness goes all over the house with me.
Here's how all this doodle stitching started.
It was just a few basic stitches: straight stitches, French knots, satin stitches, and lazy daisy flower loops. But then it turned into its own little tapestry.
I love stitching in words that are a little hidden.
Eat, Write, Dream, Stitch Happiness

Friday, February 14, 2014

A Little Mug Rug Love

With some felt scraps and floss - this mug rug stitched up in no time! It's for darling daughter's Valentines bag today - she collects owls, so I couldn't resist making an owl thing. 


I use #5 pearl cotton floss - I love those rich colors and the fact that you don't have to separate it like regular floss. For the two main pieces, I just did a wavy cut with scissors and made the red base, and then the beige center which was cut a little smaller. I cut all the little pieces for the owl freehand, except the white circles were diecut. Then I did all the embroidery before stitching the beige onto the red. Also, before I stitched the two main pieces together, I embroidered a little message on the bottom - and that was one easy mug rug to make! Now I'm going to start on some mug rug flower shapes for Easter! Happy heart day everyone!

Eat, Write, Dream, Stitch, Love

Thursday, September 19, 2013

Wearable Art Scissor Holder

I love having my little stork scissors handy when I am embroidering...or even knitting or working at the sewing machine. Although now I have a sewing machine with the automatic cutting feature (finally), I still need to snip threads while I'm working.

This little embroidery scissor necklace is made of embroidered felt, a crocheted chain, and a couple of grommets. Easy peezie!

I just began by cutting two pattern pieces to fit the scissors I want to use it for--which are my little gold stork scissors. I embroidered some easy flowers on the front section, and then appliqued a little butterfly and did some loopy embroidering on the top of the back section. I made the grommet holes, then stitched the two sides together with a blanket stitch and light pink embroidery floss. I used a fun yarn to crochet a chain...and done!
Cutting out a little pattern
The two pieces are cut from white felt
Embroidering the front--doodle stitches

Playing with both pieces
Easy supplies for this little project
I can also tuck some floss into my little scissor holder--my projects sometimes travel around!

Eat, Write, Dream, Stitch Happy